
Creating a CentOS 6 KVM Networked Bridge Interface - Techotopia
Clearly the host in our example system currently only has the loopback interface (lo) configured. In order to configure a bridge interface, click on the + button to launch the Configure network interface wizard:
Make sure that the Interface type: menu is set to Bridge before clicking Forward to move on to the second screen:
Within this screen, specify the name of the bridge (or use the default br0) and choose whether the bridge is to be activated now and on future system start ups. Finally, locate the physical device from the list to which the bridge is to be connected (in this case eth0) and set the corresponding checkbox. Once the settings are configured, click on the Finish button to commit the changes.
With this package installed it is time to look at the current network configuration. The easiest way to do this is to run the ifconfig command. The following shows output from running ifconfig on a system on which KVM is installed, but on which a network bridge has yet to be configured:
When this option is selected for a virtual machine it will have access to the external network using the same eth0 device used by the host. Assuming that KVM is now installed and a network bridge configured (if required), we are ready to move on to the next chapter and look at creating a CentOS 6 KVM Virtual Machine.
By default, the KVM virtualization environment on CentOS 6 only creates a virtual network to which virtual machines may connect. The goal of this chapter is to cover the steps involved in creating a network bridge on CentOS 6 enabling guest systems to share one or more of the host system’s physical network connections.
Network bridges may be configured on CentOS 6 either by manually editing the host system’s network configuration files, or by using the virt-manager tool. Both techniques will be covered in this chapter.
CentOS 6 Virtual Networks and Network Bridges
A KVM virtual machine running on CentOS 6 has two options in terms of networking connectivity.
One option is for it to be connected to a virtual network running within the operating system of the host computer. In this configuration any virtual machines on the virtual network can see each other but access to the external network is provided by Network Address Translation (NAT). When using the virtual network and NAT, each virtual machine is represented on the external network (the network to which the host is connected) using the IP address of the host system. This is the default behavior for KVM virtualization and requires no additional configuration, other than selecting the Virtual network option on the Network screen of the virt-manager new virtual machine wizard. Typically, a single virtual network is created by default, represented by the name default and the device virbr0.
In order for guests to appear as individual and independent systems on the external network (i.e. with their own IP addresses), they must be configured to share a physical network interface on the host. This is achieved by configuring a network bridge interface on the host system to which the guests can connect. In the remainder of this chapter we will cover the steps necessary to configure a CentOS 6 network bridge for use by KVM based guest operating systems.
Creating a CentOS 6 Network Bridge using virt-manager
By far the easiest way to configure a network bridge on a CentOS 6 KVM host is to use the virt-manager tool. This tool may be launched either by selecting the Applications -> System Tools -> Virtual Machine Manager menu option, or by entering virt-manager in a terminal window.
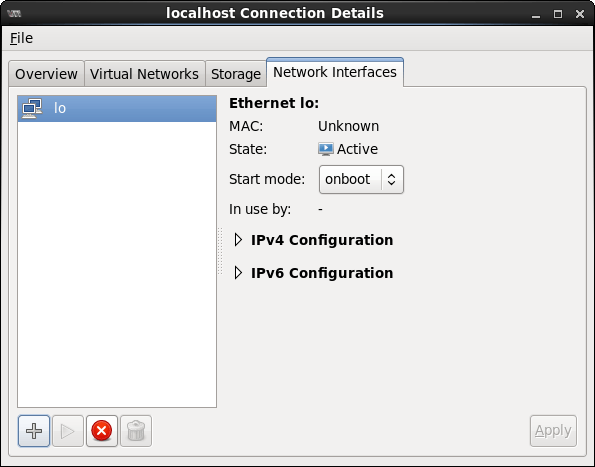
Once launched, select the Edit -> Connection Details menu option and in the resulting dialog select the Network Interfaces tab as illustrated in the following figure:

Clearly the host in our example system currently only has the loopback interface (lo) configured. In order to configure a bridge interface, click on the + button to launch the Configure network interface wizard:

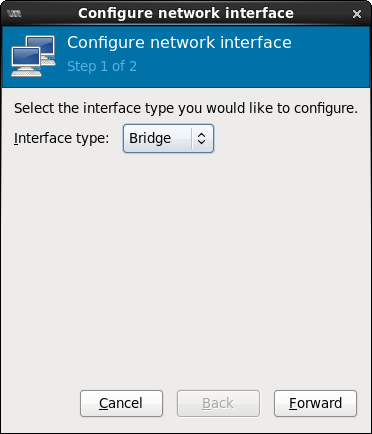
Make sure that the Interface type: menu is set to Bridge before clicking Forward to move on to the second screen:

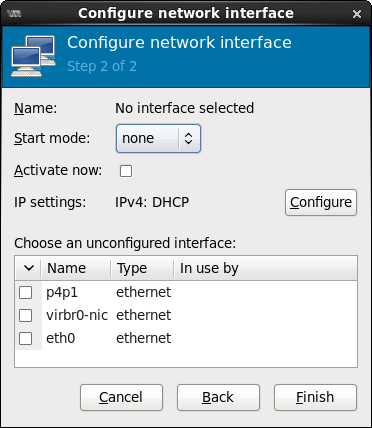
Within this screen, specify the name of the bridge (or use the default br0) and choose whether the bridge is to be activated now and on future system start ups. Finally, locate the physical device from the list to which the bridge is to be connected (in this case eth0) and set the corresponding checkbox. Once the settings are configured, click on the Finish button to commit the changes.
On completion of the bridge configuration, the bridge will now be listed in the Network Interfaces screen with eth0 listed as the Slave Interface.
Manually Creating a CentOS 6 Network Bridge
The manual creation of a network bridge involves the use of the bridge-utils package. Begin by checking if this is already installed by executing the following command:
rpm –q bridge-utils
If the package is not yet installed, install it using yum:
su –
yum install bridge-utils
# chkconfig NetworkManager off

# chkconfig –levels 35 network on

# service NetworkManager stop

# service network restart
With this package installed it is time to look at the current network configuration. The easiest way to do this is to run the ifconfig command. The following shows output from running ifconfig on a system on which KVM is installed, but on which a network bridge has yet to be configured:
eth0      Link encap:Ethernet  HWaddr 00:18:E7:16:DA:65
          inet addr:192.168.0.117  Bcast:192.168.0.255  Mask:255.255.255.0
          inet6 addr: fe80::218:e7ff:fe16:da65/64 Scope:Link
          UP BROADCAST RUNNING MULTICAST  MTU:1500  Metric:1
          RX packets:556 errors:0 dropped:0 overruns:0 frame:0
          TX packets:414 errors:0 dropped:0 overruns:0 carrier:0
          collisions:0 txqueuelen:1000
          RX bytes:222834 (217.6 KiB)  TX bytes:48430 (47.2 KiB)
          Interrupt:16 Base address:0x4f00

lo        Link encap:Local Loopback
          inet addr:127.0.0.1  Mask:255.0.0.0
          inet6 addr: ::1/128 Scope:Host
          UP LOOPBACK RUNNING  MTU:16436  Metric:1
          RX packets:8 errors:0 dropped:0 overruns:0 frame:0
          TX packets:8 errors:0 dropped:0 overruns:0 carrier:0
          collisions:0 txqueuelen:0
          RX bytes:480 (480.0 b)  TX bytes:480 (480.0 b)

virbr0    Link encap:Ethernet  HWaddr 52:54:00:2A:C1:7E
          inet addr:192.168.122.1  Bcast:192.168.122.255  Mask:255.255.255.0
          UP BROADCAST RUNNING MULTICAST  MTU:1500  Metric:1
          RX packets:0 errors:0 dropped:0 overruns:0 frame:0
          TX packets:13 errors:0 dropped:0 overruns:0 carrier:0
          collisions:0 txqueuelen:0
          RX bytes:0 (0.0 b)  TX bytes:2793 (2.7 KiB)
In the above output, the entry for eth0 represents a physical network adaptor on the host computer. This is the connection currently used by this host to access the external network. The virbr0 entry represents the virtual network to which guest operating systems will connect if configured to do so.
In order to provide the option for guest operating systems to share the eth0 connection of the host it is necessary to establish a network bridge between eth0 and the virtual machines.
Begin the bridge creation process by gaining root access and changing directory to the /etc/sysconfig/network-scripts directory:
su –
cd /etc/sysconfig/network-scripts
If the interface to be bridged is currently running it should be taken down before proceeding:
ifdown eth0
The next step is to add a script file to establish the bridge for the physical network device. In this example the device is eth0 so we need to create a file name ifcfg-eth0 and add the following lines to it. For the purposes of this example we will name the interface br0:
DEVICE=eth0
ONBOOT=yes
BRIDGE=br0
The next step is to create a script file for the bridge interface. The name of this file must take the form ifcfg-<bridgename> where <bridgename> matches the name of the bridge defined in the BRIDGE= directive outlined above. Given this requirement, we will name the file ifcfg-br0. The contents of this file for this example will read as follows:
DEVICE=br0
ONBOOT=yes
TYPE=Bridge
BOOTPROTO=dhcp
STP=on
DELAY=0
Note that the DEVICE= line must refer to the bridge name previously specified (i.e. bridge0 in this instance). Save the file and then start up both interfaces:
ifup eth0
ifup br0
Using the ifconfig command, the new bridge interface should now be visible:
br0       Link encap:Ethernet  HWaddr 00:18:E7:16:DA:65
          inet addr:192.168.0.117  Bcast:192.168.0.255  Mask:255.255.255.0
          inet6 addr: fe80::218:e7ff:fe16:da65/64 Scope:Link
          UP BROADCAST RUNNING MULTICAST  MTU:1500  Metric:1
          RX packets:113 errors:0 dropped:0 overruns:0 frame:0
          TX packets:65 errors:0 dropped:0 overruns:0 carrier:0
          collisions:0 txqueuelen:0
          RX bytes:10627 (10.3 KiB)  TX bytes:11488 (11.2 KiB)

eth0      Link encap:Ethernet  HWaddr 00:18:E7:16:DA:65
          UP BROADCAST RUNNING MULTICAST  MTU:1500  Metric:1
          RX packets:479 errors:0 dropped:0 overruns:0 frame:0
          TX packets:179 errors:0 dropped:0 overruns:0 carrier:0
          collisions:0 txqueuelen:1000
          RX bytes:50559 (49.3 KiB)  TX bytes:23083 (22.5 KiB)
          Interrupt:16 Base address:0xaf00

lo        Link encap:Local Loopback
          inet addr:127.0.0.1  Mask:255.0.0.0
          inet6 addr: ::1/128 Scope:Host
          UP LOOPBACK RUNNING  MTU:16436  Metric:1
          RX packets:8 errors:0 dropped:0 overruns:0 frame:0
          TX packets:8 errors:0 dropped:0 overruns:0 carrier:0
          collisions:0 txqueuelen:0
          RX bytes:480 (480.0 b)  TX bytes:480 (480.0 b)

virbr0    Link encap:Ethernet  HWaddr 52:54:00:2A:C1:7E
          inet addr:192.168.122.1  Bcast:192.168.122.255  Mask:255.255.255.0
          UP BROADCAST RUNNING MULTICAST  MTU:1500  Metric:1
          RX packets:0 errors:0 dropped:0 overruns:0 frame:0
          TX packets:16 errors:0 dropped:0 overruns:0 carrier:0
          collisions:0 txqueuelen:0
          RX bytes:0 (0.0 b)  TX bytes:3354 (3.2 KiB)
IP STATIC.
# vi /etc/sysconfig/network-scripts/ifcfg-br0
DEVICE=br0
TYPE=Bridge
BOOTPROTO=static
BROADCAST=192.168.1.255
IPADDR=192.168.1.200
NETMASK=255.255.255.0
NETWORK=192.168.1.0
GATEWAY=192.168.1.1
ONBOOT=yes
# vi /etc/sysconfig/network-scripts/ifcfg-eth0
DEVICE=eth0
HWADDR=DD:27:88:03:88:22
ONBOOT=yes
TYPE=Ethernet
IPV6INIT=no
USERCTL=no
BRIDGE=br0
# service network restart
# brctl show
Configuring a CentOS 6 Firewall for a Network Bridge
If a firewall is enabled on the Ce
ntOS 6 host, it may be necessary to add an iptables rule to allow network traffic via the bridge interface. This is achieved by adding a rule similar to the following to the /etc/sysconfig/iptables configuration file:
ntOS 6 host, it may be necessary to add an iptables rule to allow network traffic via the bridge interface. This is achieved by adding a rule similar to the following to the /etc/sysconfig/iptables configuration file:
-A RH-Firewall-1-INPUT -i bridge0 -j ACCEPT
The change to the firewall will not take effect until the service is restarted, so complete the configuration by running the following command at the prompt in a terminal window:
/sbin/service iptables restart
Configuring a Virtual Machine to use the Network Bridge
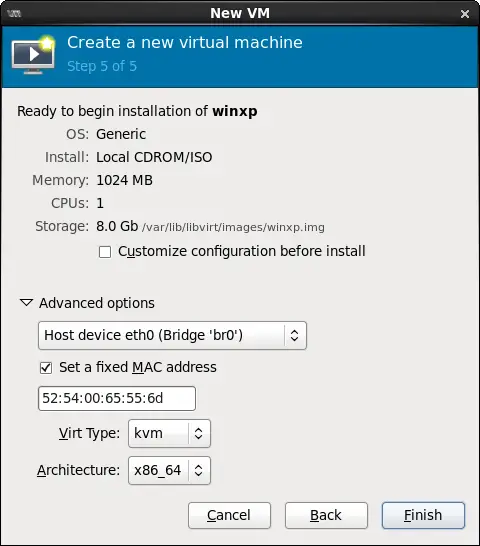
During the virtual machine creation process using the virt-manager tool, the network configuration screen will list now Host device eth0 (Bridge ‘br0’) under the Advanced options section of the final page of the new virtual machine creation wizard:

When this option is selected for a virtual machine it will have access to the external network using the same eth0 device used by the host. Assuming that KVM is now installed and a network bridge configured (if required), we are ready to move on to the next chapter and look at creating a CentOS 6 KVM Virtual Machine.
KVM based virtual machines can easily be configured on CentOS 6 using either the virt-install command-line tool, or the virt-manager GUI tool. For the purposes of this chapter we will use the virt-manager tool to install Windows 7 as a KVM guest on a CentOS 6 host.
The command-line approach to virtual machine creation will be covered in the next chapter entitled Creating CentOS 6 Hosted KVM Virtual Machines with virt-install and virsh.
Comentarios
Publicar un comentario