
Oracle Linux 7 R.C
Oracle has announced that the initial beta build of Oracle Linux 7.0,a distribution built from source for
Red Hat and enhanced with an "unbreakable" Linux kernel and now it's Ready for your Testing.
- RHEL 7 Will now format drives with the XFS filesystem by default.
- enabling volumes of up to 500TB in size.
- if you prefer the older ext4 filesystem it's now supports 50TB volumes.
- improves support for large-scale enterprise storage arrays.
- provides new tools for managing heterogeneous storage.
- New Version of SAMBA 4.1.
You Can Download it From Here.
Oracle Linux brings the latest Linux innovations to market, delivering extreme performance, advanced scalability, and reliability for enterprise applications and systems along with worldwide, enterprise-class, low-cost support. Optimized for enterprise workloads, Oracle Linux is the only operating system to offer zero-downtime updates.
Oracle has announced that the initial beta build of Oracle Linux 7.0,a distribution built from source for
Red Hat and enhanced with an "unbreakable" Linux kernel and now it's Ready for your Testing.
Red Hat and enhanced with an "unbreakable" Linux kernel and now it's Ready for your Testing.
- RHEL 7 Will now format drives with the XFS filesystem by default.
- enabling volumes of up to 500TB in size.
- if you prefer the older ext4 filesystem it's now supports 50TB volumes.
- improves support for large-scale enterprise storage arrays.
- provides new tools for managing heterogeneous storage.
- New Version of SAMBA 4.1.
You Can Download it From Here.
Oracle Linux brings the latest Linux innovations to market, delivering extreme performance, advanced scalability, and reliability for enterprise applications and systems along with worldwide, enterprise-class, low-cost support. Optimized for enterprise workloads, Oracle Linux is the only operating system to offer zero-downtime updates.
Why Oracle Linux?
Oracle is the only vendor in the industry that offers a complete Linux-based solution stack—applications, middleware, database, management tools, operating system and hardware, along with a single point of support. Oracle invests significantly in testing Oracle Linux and releasing critical bug fixes faster, enabling enterprises to deploy with confidence. And Oracle Linux Support provides industry-leading global support for the Linux operating system at dramatically lower cost.

Oracle is the only vendor in the industry that offers a complete Linux-based solution stack—applications, middleware, database, management tools, operating system and hardware, along with a single point of support. Oracle invests significantly in testing Oracle Linux and releasing critical bug fixes faster, enabling enterprises to deploy with confidence. And Oracle Linux Support provides industry-leading global support for the Linux operating system at dramatically lower cost.
Operating System
Oracle Linux is an open-source operating system available under the GNU General Public License. The only operating system to offer zero-downtime patching, Oracle Linux is optimized for Oracle hardware and software and provides enterprises with the benefits of the latest Linux innovations including rigorous testing with real-world workloads.
Oracle Linux is an open-source operating system available under the GNU General Public License. The only operating system to offer zero-downtime patching, Oracle Linux is optimized for Oracle hardware and software and provides enterprises with the benefits of the latest Linux innovations including rigorous testing with real-world workloads.
Released earlier this month was the first beta of Oracle Linux 7.0, Oracle's spin of the Red Hat Enterprise Linux 7.0 development source-code. With some days having passed we've now had the time to take Oracle Linux 7.0 Beta 1 for a test drive and see how the performance compares to Oracle Linux 6.5.

In the days ahead we will have benchmarks of Ubuntu 12.04 LTS against Oracle Linux 6.5 and 7.0 Beta 1 along with CentOS 6.5 and the RHEL 7 release candidate among other enterprise-oriented Linux distributions. For this article to end out the weekend are just some benchmarks of Oracle Linux 6.5 vs. 7.0 Beta 1 when tested from the same hardware -- an Intel Core i7 3960X Ivy Bridge Extreme Edition system with a total of 12 logical CPU threads.

Like upstream Red Hat Enterprise Linux 7, Oracle Linux 7 is also using the GNOME Shell 3.8 desktop environment. XFS is also the default file-system in place of EXT4 from RHEL/Oracle Linux 6.

Similar to upstream RHEL7, Oracle Linux 7.0 Beta 1 is shipping with a RHEL7-compatible Linux 3.10 kernel, X.Org Server 1.15 RC1, Mesa 9.2.2, and the GCC 4.8.2 compiler.

With Oracle Linux 6.5 having GCC 4.4.7 by default, going to Oracle Linux 7 means a performance improvement for many built-from-source, performance-sensitive workloads thanks to the improvements within the GNU Compiler Collection in recent years.


The PostMark disk performance was slightly faster in Oracle Linux 7 using XFS over EXT4 in Oracle Linux 6.5.

GCC 4.8 is responsible for yielding most of the performance improvements out of this round of Oracle Linux 6.5 vs. 7.0 Beta 1 performance testing. While by default a Linux 3.10 EL7-compatible kernel is used, Oracle Linux 7.0 Beta 1 has a 3.8-based kernel that contains Oracle's "Unbreakable Enterprise Kernel" patches.

See more of our early Oracle Linux 7.0 open-source benchmarks done via the Phoronix Test Suite at 1404208-KH-ORACLE76L05. Again, in the days ahead will be more thorough testing with multiple enterprise-grade Linux distributions. Have other test requests? Let us know via Phoronix on Facebook, Google+, or Twitter.
Oracle Linux 7 (OL7) Installation
Oracle Linux 7 is currently a beta release. This installation should not be used for a real system.
This article provides a pictorial guide for performing a basic installation of Oracle Linux 7 (OL7).
Basic Installation
- Boot from the DVD. Use the up arrow to pick the "Install Oracle Linux 7.0" option and hit the return key.

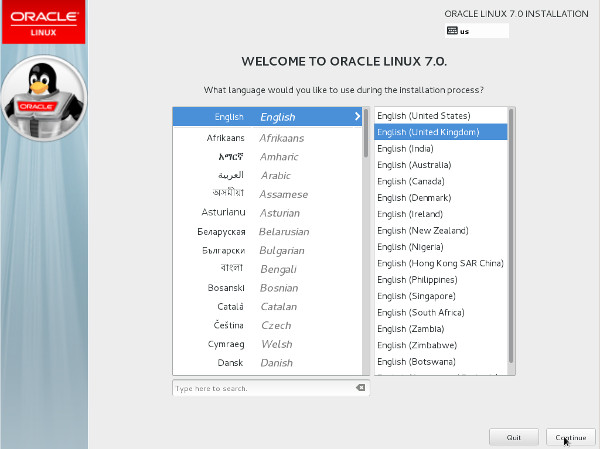
- Select the appropriate language and select the "Set keyboard to default layout for selected language" option, then click the "Continue" button.
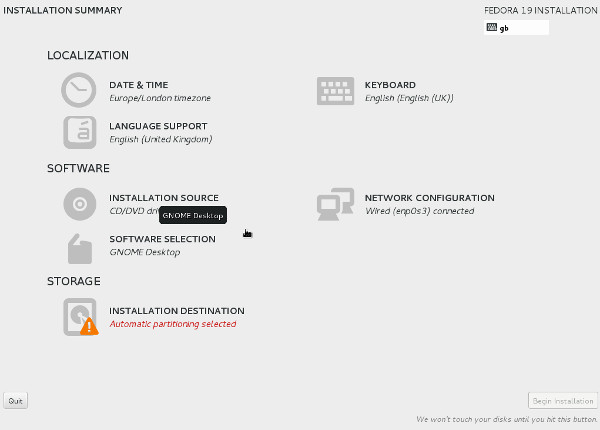
Click the "I want to proceed." button on the pre-release software warning screen. - You are presented with the "Installation Summary" screen. You must complete any marked items before you can continue with the installation. Depending on your requirements, you may also want to alter the default settings by clicking on the relevant links.
Click the "Installation Destination" link. - If you are happy to use automatic partitioning of the whole disk, click the "Done" button to return to the previous screen.
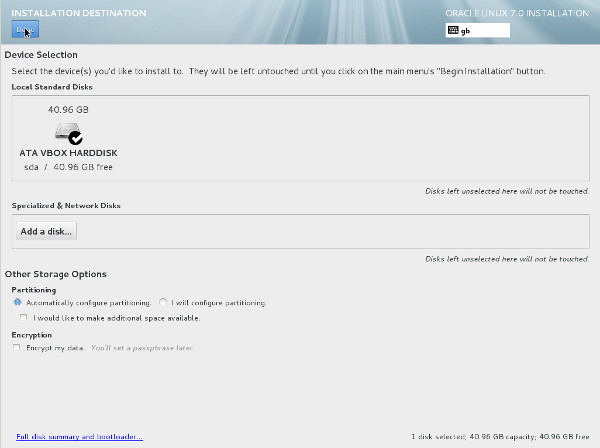
If you want to modify the partitioning configuration, click the "Continue" button and work through the partitioning screens. - Click the "Continue" button on the "Installation Options" screen.

- It would be advisable to click on the "Software Selection" link and pick the following options if you want a GUI console.
- Base Environment > GNOME Desktop
- Add-Ons for Selected Environment > Additional Development
- Add-Ons for Selected Environment > Additional Development
- Add-Ons for Selected Environment > Base
- Add-Ons for Selected Environment > Compatibility Libraries
- Add-Ons for Selected Environment > Development Tools
- Add-Ons for Selected Environment > Fonts
- Add-Ons for Selected Environment > Internet Browser
- Add-Ons for Selected Environment > Perl Support
- Add-Ons for Selected Environment > X Window System

- Once you have completed your alterations to the default configuration, click the "Begin Installation" button.

- Click the "Root Password" link.

- Enter the root password and click the "Done" button.

Click the "User Creation" link. - Enter the user details and select the "Make this user administrator" option, then click the "Done" button.

- Wait for the installation to complete. When prompted, click the "Reboot" button.

- Click the "Finish Configuration" button.

- On the sign-in screen, click on the user you want to log in as.

- Enter the password and click the "Sign In" button.

- Accept the language by clicking the "Next" button.

- Accept the input sources by clicking the "Next" button.

- Click the "Start using Oracle Linux Everything" button.

- You are now presented with the console screen.

Network Configuration
- If you are using DHCP to configure your network settings, then ignore the following network configuration screens, otherwise click the network icon on the top bar and click the "Network Settings" link. You are then presented with the "Settings" screen. Highlight "Wired", flick the switch to "ON" and click the cog icon at the bottom-right.

- Click the IPv4 option, select the "Manual" method and enter the appropriate IP address and subnet mask, default gateway and primary DNS, then click the "Apply" button.

- Close the "Network" dialog.
Customizing Software
- You can customize the installed packages using the "Software" dialog (Applications > System Tools Software).

SELinux
- If the OS is to be used for an Oracle installation, it is easier if Secure Linux (SELinux) is disabled or switched to permissive. To do this edit the "/etc/selinux/config" file, making sure the SELINUX flag is set as follows.
If SELinux is configured after installation, the server will need a reboot for the change to take effect.SELINUX=permissive
Firewall
- If the OS is to be used for an Oracle installation, it is easier if the firewall is disabled. This can be done by issuing the following commands from a terminal window as the "root" user.
# systemctl stop firewalld
# systemctl disable firewalld
You can install and configure it later if you wish.
SSH
- Make sure the SSH daemon is started using the following commands.
# systemctl start sshd.service
# systemctl enable sshd.service
For more information see:
Comentarios
Publicar un comentario