
Advanced Network Monitoring Using Oracle Solaris 11 Tools
How to use Oracle Solaris 11 networking tools to generate, observe, and analyze network statistics.
Published September 2013
In this article, we will examine three use cases in order to demonstrate the capability of Oracle Solaris 11 tools. The first use case will show how to measure the network bandwidth between two systems. The second use case will demonstrate how to observe network statistics on a specific TCP port, and the last use case will demonstrate, by example, how to collect and display historical statistics of network resource usage for a given date and time range.
|
The following are benefits of using these tools:
- The tools are built into the Oracle Solaris 11 operating system, so there is no need to install or buy third-party applications or use special hardware equipment in order to run the network measurements.
- The tools have low performance overhead (about 5 percent) during the network statistics collection, so it is safe to use them on a production system, and they have a minimum performance impact on the network I/O workload. In addition, we can enable or disable the tools without the need to reboot Oracle Solaris 11.
- It is possible to monitor physical or virtual network elements—such as virtual network interface cards (VNICs) or virtual operating systems (for example, Oracle Solaris Zones) in a multitenant cloud environment—and very accurate observations are obtainable based on the specific virtual element being monitored.
- It is feasible to collect historical network statistics in order to generate a baseline for the network activity. This baseline can be used to compare current network activity to previous activity and to help with capacity planning for future growth. In addition, you can generate statistical reports based on a given date and time range and visualize your network activity.
In the example presented in this article, all the building blocks will be installed using Oracle Solaris Zones, ZFS, and network virtualization technologies. Figure 1 shows the architecture:

Figure 1
Measuring the Network Bandwidth Between two Environments
In the first use case, we will measure the network bandwidth between two environments.
Note: You can use these tools and procedures between physical systems or virtual systems (for example, Oracle Solaris Zones).
When doing performance benchmarks, it is desirable to measure network bandwidth, which in turn helps to measure network scalability. In addition, testing the network capability helps eliminate the network as a limiting factor in a given environment.
A useful tool for this kind of task is the
iperf(1) tool, which provides the ability to the measure the performance of a network, and it can observe TCP or UDP throughput and provide real-time statistics. We will use this tool in order to measure the maximum network bandwidth between two Oracle Solaris Zones.
Oracle Solaris 11 network virtualization allows us to build any physical network topology inside the Oracle Solaris operating system including VNICs, virtual switches (vSwitches), and more-sophisticated network components (for example, load balancers, routers, andfirewalls), as shown in Figure 2.
The benefits for using this technology include reducing infrastructure cost, since there is no need to invest in superfluous network equipment. In addition, the infrastructure deployment is much faster, since all the network building blocks are based on software, not on hardware.
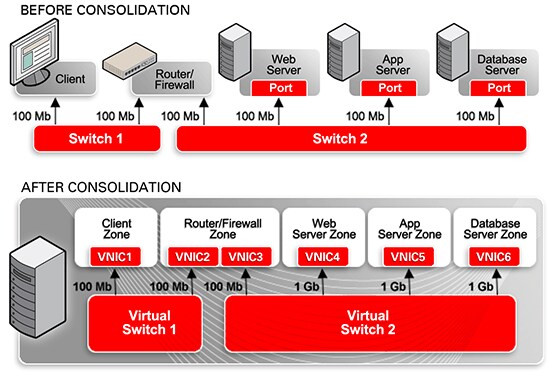
Figure 2
In this use case, we will leverage the ability to create VNICs on top of the physical network card.
Creating the VNICs
First, let's create the VNICs (in a later step, we will associate the VNICs with Oracle Solaris Zones):
root@global_zone:~# dladm create-vnic vnic0 -l net0
root@global_zone:~# dladm create-vnic vnic1 -l net0
Verify the VNIC creation using the
dladm show-vnic command:root@global_zone:~# dladm show-vnic LINK OVER SPEED MACADDRESS MACADDRTYPE VID vnic0 net0 1000 2:8:20:c0:c:d0 random 0 vnic1 net0 1000 2:8:20:7c:9:c6 random 0
We can see the two VNICs,
vnic0 and vnic1, have been created, and we can see their MAC address and the physical link that they are associated with (net0).
Creating the First Zone (source_zone)
Oracle Solaris Zones are built-in virtualization technology available in Oracle Solaris. In this first use case, we will use them to contain our testing environments.
If you don't already have a file system for the
source_zone and target_zone zones, run the following command:root@global_zone:~# zfs create -o mountpoint=/zones rpool/zones
We can use the
zonecfg command in order to create our first zone, source_zone. The minimum information required to create a zone is its name and its zonepath. In addition, we will add the VNIC named vnic0, which we created in the previous section.root@global_zone:~# zonecfg -z source_zone Use 'create' to begin configuring a new zone. zonecfg:source_zone> create create: Using system default template 'SYSdefault' zonecfg:source_zone> set zonepath=/zones/source_zone zonecfg:source_zone> add net zonecfg:source_zone:net> set physical=vnic0 zonecfg:source_zone:net> end zonecfg:source_zone> verify zonecfg:source_zone> commit zonecfg:source_zone> exit
The next step is to install the zone:
root@global_zone:~# zoneadm -z source_zone install
Then, we need to boot the zone:
root@global_zone:~# zoneadm -z source_zone boot
Log in to
source_zone. We will specify the zone's system configuration using the System Configuration Tool.root@global_zone:~# zlogin -C source_zone
Specify the following information during the interactive screens in the System Configuration Tool:
- Computer Name: source_zone
- Network connection configured: Manually
- Wired network connection to be configured during installation: vnic0
- IP address: 10.0.0.1
- Netmask: 255.255.255.0
- DNS Name Service: Do not configure DNS
- Alternative Name Service: None
- Time Zone Region: Europe
- Time Zone Location: Britain (UK)
- Time Zone: GB
In addition specify a root password.
When you are finished, you should see the see the zone boot messages. Log in to the zone at the zone console login prompt as
root.source_zone console login: root Password:
After logging in to the zone, verify the networking configuration using the
ipadm command:root@source_zone:~# ipadm show-addr ADDROBJ TYPE STATE ADDR lo0/v4 static ok 127.0.0.1/8 vnic0/v4 static ok 10.0.0.1/24 lo0/v6 static ok ::1/128 vnic0/v6 addrconf ok fe80::8:20ff:fec0:cd0/10
As you can see,
vnic0 has IP address 10.0.0.1 .
The next step is to install the
iperf tool inside source_zone using the command shown in Listing 1:root@source_zone:~# pkg install iperf
Packages to install: 1
Create boot environment: No
Create backup boot environment: No
DOWNLOAD PKGS FILES XFER (MB) SPEED
Completed 1/1 6/6 0.0/0.0 942k/s
PHASE ITEMS
Installing new actions 20/20
Updating package state database Done
Updating image state Done
Creating fast lookup database Done
Listing 1
Exit from the zone console using the "
~." escape sequence.source_zone:~# ~. [Connection to zone 'source_zone' console closed]
Creating the Second Zone (target_zone)
The next step is to set up the target zone from the global zone using the
zonecfg command.
During the zone configuration, we will provide the zone name, the zonepath, and the VNIC name (
vnic1).root@global_zone:~# zonecfg -z target_zone Use 'create' to begin configuring a new zone. zonecfg:target_zone> create create: Using system default template 'SYSdefault' zonecfg:target_zone> set zonepath=/zones/target_zone zonecfg:target_zone> add net zonecfg:target_zone:net> set physical=vnic1 zonecfg:target_zone:net> end zonecfg:target_zone> verify zonecfg:target_zone> commit zonecfg:target_zone> exit
The next step is to install the zone:
root@global_zone:~# zoneadm -z target_zone install
Then, boot the zone:
root@global_zone:~# zoneadm -z target_zone boot
Check the status of the zones that we've created:
root@global_zone:~# zoneadm list -cv
  ID NAME             STATUS     PATH                           BRAND    IP
   0 global           running    /                              solaris  shared
   1 source_zone      running    /zones/source_zone             solaris  excl
   2 target_zone      running    /zones/target_zone             solaris  excl
We can see that the status of
target_zone and source_zone is running.
Log in to
target_zone:root@global_zone:~# zlogin -C target_zone
Specify the following information during the interactive screens in the System Configuration Tool:
- Computer Name: target_zone
- Network connection configured: Manually
- Wired network connection to be configured during installation: vnic1
- IP address: 10.0.0.2
- Netmask: 255.255.255.0
- DNS Name Service: Do not configure DNS
- Alternative Name Service: None
- Time Zone Region: Europe
- Time Zone Location: Britain (UK)
- Time Zone: GB
In addition specify a root password.
After finishing the zone configuration, as user
root, log in to the zone at the zone console login prompt:target_zone console login: root Password:
Verify the networking configuration using the
ipadm command:root@target_zone# ipadm show-addr ADDROBJ TYPE STATE ADDR lo0/v4 static ok 127.0.0.1/8 vnic1/v4 static ok 10.0.0.2/24 lo0/v6 static ok ::1/128 vnic1/v6 addrconf ok fe80::8:20ff:fe7c:9c6/10
As you can see,
vnic1 has IP address 10.0.0.2.
Now, from
target_zone, check that you can ping source_zone.root@target_zone:~# ping 10.0.0.1 10.0.0.1 is alive
Note: In some environments, the Oracle Solaris 11 firewall might block network traffic. If your security policy allows it, you can disable the firewall service using the
svcadm disable ipfilter command or by adding firewall rule in order to enable network traffic between the two environments. For more Oracle Solaris firewall examples, see "Securing the Network in Oracle Solaris 11.1."
Install the
iperf tool using the following command:root@target_zone:~# pkg install iperf
Starting the Network Performance Benchmark
In order to perform an
iperf measurement, you must establish both a server and a client to generate the network traffic.
Therefore, on the target zone, run the
iperf command in server mode using the following command, where-sspecifies server mode.-lsets the length of the read/write buffer (128K).
root@target_zone:~# iperf -s -l 128k
After running the
iperf command, you will see the following message on the terminal:------------------------------------------------------------ Server listening on TCP port 5001 TCP window size: 125 KByte (default) ------------------------------------------------------------
The next step is to run the
iperf client on the source zone.
From another terminal window, log in to the source zone:
global_zone# zlogin source_zone
Run the following
iperf command in client (that is, loader) mode on the source zone, where-cspecifies the command in client mode.-lsets the length of the read/write buffer (128K).-Pspecifies the number of parallel client threads to run (4).-i npauses n seconds (1 second, in this case) between periodic bandwidth reports.-tspecifies the time in seconds to transmit data (180 seconds).
root@source_zone:~# iperf -c 10.0.0.2 -l 128k -P 4 -i 1 -t 180
Note: 10.0.0.2 is the IP address of
target_zone.
After running the
iperf command, you will start to see runtime statistics:------------------------------------------------------------ Client connecting to 10.0.0.2, TCP port 5001 TCP window size: 48.0 KByte (default) ------------------------------------------------------------ [ 6] local 10.0.0.1 port 54972 connected with 10.0.0.2 port 5001 [ 4] local 10.0.0.1 port 64738 connected with 10.0.0.2 port 5001 [ 5] local 10.0.0.1 port 60614 connected with 10.0.0.2 port 5001 [ 3] local 10.0.0.1 port 57875 connected with 10.0.0.2 port 5001 [ ID] Interval Transfer Bandwidth [ 5] 0.0- 1.0 sec 316 MBytes 2.65 Gbits/sec
Displaying the Network Statistics
On
target_zone, we use the dlstat(1m) command in order to display the network statistics for the vnic1 network interface. Thedlstat(1m) command reports network usage statistics during runtime about physical or virtual data links (for example, VNICs).
Open another terminal and log in to
target_zone.
The following command displays statistics for
vnic1 at one-second time intervals:root@target_zone:~# dlstat -i 1 vnic1 LINK IPKTS RBYTES OPKTS OBYTES vnic1 144.51M 217.32G 18.69M 1.23G vnic1 806.08K 1.21G 100.83K 6.66M vnic1 813.68K 1.22G 101.72K 6.71M vnic1 846.54K 1.27G 105.89K 6.99M vnic1 868.58K 1.31G 108.63K 7.17M ^C
Note: In order to stop the
dlstat command press Ctrl-c.
As you can see, the
dlstat command displays the following information:- The number of inbound packets (
IPKTS) - How many bytes have been received (
RBYTES) - The number of outbound packets (
OPKTS) - How many bytes have been transmitted (
OBYTES)
One of the main challenges in a multitenant cloud environment with many Oracle Solaris Zones running various network workloads is the ability to find system resources that are overloaded.
Using the Oracle Solaris 11 monitoring tools, we can pinpoint our network measurement to a specific zone and a specific VNIC in order to find a bottleneck. For example, let's display network statistics for a given zone and its associated network cards.
Before we start our observation, we need to rerun the
iperf network workload from source_zone:root@source_zone:~# iperf -c 10.0.0.2 -l 128k -P 4 -i 1 -t 180
To display network statistics for
target_zone and source_zone, run following command from the global zone:root@global_zone:~# dlstat -i 1 -z target_zone,source_zone LINK IPKTS RBYTES OPKTS OBYTES source_zone/vnic0 16.07M 1.06G 4.62M 177.86G target_zone/vnic1 123.48M 185.71G 16.06M 1.06G ^C
Note: To stop the
dlstat command, press Ctrl-c.
As you can see, we were able to monitor both zones and their VNICs at the same time!
We can observe how many bytes each zone and its associated VNIC is transmitting (
OBYTES) or receiving (RBYTES).
Another useful command that we can use in order to monitor the network in a multitenant cloud environment is the
zonestat(1) command .
For example, we can monitor per zone network statistics in addition to CPU and memory utilization:
root@global_zone:~# zonestat -z source_zone -z target_zone 1
Collecting data for first interval...
Interval: 1, Duration: 0:00:01
SUMMARY                   Cpus/Online: 4/4   PhysMem: 15.9G  VirtMem: 17.9G
                    ---CPU----  --PhysMem-- --VirtMem-- --PhysNet--
               ZONE  USED %PART  USED %USED  USED %USED PBYTE %PUSE
            [total]  3.15 78.9% 1838M 11.2% 3857M 20.9%  484K 0.04%
           [system]  1.86 46.6% 1224M 7.47% 3430M 18.6%     -     -
        source_zone  0.59 14.7% 62.1M 0.37% 51.3M 0.27%  483K 0.04%
        target_zone  0.47 11.9% 62.4M 0.38% 51.5M 0.27%   132 0.00%
^C
Note: To stop the
zonestat command, press Ctrl-c.
We can see utility reports for the CPU, memory, and networking for the
source_zone and target_zone zones. Each zone's utilization is reported both as a percentage of system resources and of the zone's configured limits.
We can use the
-r option in order to provide detailed output for specific resources (for example, networking). In addition, we can use the-x option to provide an extended view with more detailed information, as shown in Listing 2.root@global_zone:~# zonestat -z source_zone -z target_zone -r network -x 1
Collecting data for first interval...
Interval: 1, Duration: 0:00:01
NETWORK-DEVICE SPEED STATE TYPE
net0 1000mbps up phys
ZONE LINK TOBYTE MAXBW %MAXBW PRBYTE %PRBYTE POBYTE %POBYTE
[total] net0 926M - - 300 0.00% 144K 0.11%
global net0 1368 - - 300 0.00% 888 0.00%
target_zone vnic1 463M - - 0 0.00% 0 0.00%
source_zone vnic0 463M - - 0 0.00% 143K 0.11%
source_zone source_zone/net0 120 - - 0 0.00% 0 0.00%
target_zone target_zone/net0 120 - - 0 0.00% 0 0.00%
Listing 2
Note: To stop the
zonestat command, press Ctrl-c.
The output in Listing 2 shows the following:
- The name of a datalink (
LINK) - The number of bytes transmitted and received by datalinks or virtual links (
TOBYTE) - The maximum bandwidth configured on a datalink (
MAXBW) - The sum of all transmitted and received bytes as a percentage of the configured maximum bandwidth (
%MAXBW) - The number of received bytes that consumes the physical bandwidth (
PRBYTE) - The percentage of available physical bandwidth used to receive
PRBYTE(%PRBYE) - The number of transmitted bytes that consumes the physical bandwidth (
POBYTE) - The percentage of available physical bandwidth used to transmit
POBYTE(%POBYE)
Benchmark Summary
Let's summarize the
iperf benchmark results.
Once the network load is finished,
iperf will print the benchmark results summary.
On
target_zone, we can see the benchmark results summary:... ... [ ID] Interval Transfer Bandwidth [SUM] 0.0-180.0 sec 32.2 GBytes 9.21 Gbits/sec
As you can see from the
iperf benchmark results, the maximum network bandwidth between the two Oracle Solaris Zones is 9.21 Gbits/sec.
An interesting side point is that this value demonstrates one of the big benefits of installing applications in Oracle Solaris Zones on a single system (rather than having the applications on separate systems). There is no need for the network traffic to go off-system into the network, meaning you can achieve very high throughput with very low latency compared to systems with, say, 1 Gb physical network connections. For more examples, see "How to Control Your Application's Network Bandwidth."
Note: The network benchmark results can be different; it depends on the server model, the network card, and the network infrastructure equipment.
Monitoring Network Traffic Between Two Systems on a Specific TCP or UDP Network Port
In the second use case, we want to measure the network traffic between two systems (they can be physical or virtual) on a specific TCP or UDP network port.
Although the
dlstat(1M) and zonestat(1) commands are useful for bandwidth measurement, they lack the ability to monitor network traffic on a specific network port.
The ability to monitor specific TCP or UDP ports can be useful when you need to analyze performance issues between two systems running the same application, for example web server replication between two data centers.
In this use case, we will measure the network bandwidth between two Oracle Solaris Zones on TCP port 443, as shown in Figure 3; the first step is to set up a flow on the network card that we want to measure.
Flow is a sophisticated quality of service mechanism built into the new Oracle Solaris 11 network virtualization architecture, and it allows us to measure or limit the network bandwidth for a specific network port on a specific network interface.
In addition, flows can be created, modified, and removed in both global and non-global zones.

Figure 3
In the following example, we will set up a flow that is associated with the TCP 443 network port on the
vnic1 network interface.
On
target_zone, enable the flow:root@target_zone:~# flowadm add-flow -l vnic1 -a transport=TCP,local_port=443 https-flow
Note: You don't need to reboot the zone in order to enable or disable the flow. This is very useful when you need to debug network performance issues on a production system!
Verify the flow creation:
root@target_zone:~# flowadm show-flow
FLOW LINK IPADDR PROTO LPORT RPORT DSFLD
https-flow vnic1 -- tcp 443 -- --
You can see the
https-flow flow for the associated VNIC (vnic1) and the TCP port number (443).
On
target_zone, stop the iperf server, which you can do by pressing Ctrl-c.
On
target_zone, let's start the iperf server again, where-sspecifies the server mode.-lsets the length of the read/write buffer (128K).-pspecifies the network port (443).
root@target_zone:~# iperf -s -l 128k -p 443
------------------------------------------------------------
Server listening on TCP port 443
TCP window size: 125 KByte (default)
------------------------------------------------------------
You can see that this time, the server is listening on TCP port number 443.
In order to start the loader, on
source_zone, run the iperf command, where-cspecifies the client mode.-lsets the length of the read/write buffer (128K).-Pspecifies the number of parallel client threads to run (4).-i npauses n seconds (1 second, in this case) between periodic bandwidth reports.-tspecifies the time in seconds to transmit data (180 seconds).-pspecifies the port number (443).
source_zone:~# iperf -c 10.0.0.2 -l 128k -P 4 -i 1 -t 180 -p 443
On
target_zone, we can use the flowstat(1M) command, which reports runtime statistics about user-defined flows. This command can report the receive-side or transmit-side statistics only. In addition, it can display statistics for all flows on the specified link or statistics for the specified flow.
Report the bandwidth on the
https-flow flow, which monitors TCP port443:root@target_zone:~# flowstat -i 1 FLOW IPKTS RBYTES IDROPS OPKTS OBYTES ODROPS https-flow 24.72M 37.17G 0 3.09M 204.08M 0 https-flow 749.28K 1.13G 0 93.73K 6.19M 0 https-flow 783.68K 1.18G 0 98.03K 6.47M 0 https-flow 668.83K 1.01G 0 83.66K 5.52M 0 https-flow 783.87K 1.18G 0 98.07K 6.47M 0 https-flow 775.34K 1.17G 0 96.98K 6.40M 0 https-flow 777.15K 1.17G 0 97.21K 6.42M 0 ^C
Note: To stop the
flowstat command, press Ctrl-c.
As you can see, the
flowstat command displays the network statistics for TCP port 443. In addition, enabling the flow on the vnic1network interface did not degrade the network performance!
Let's wait a few minutes until the load on
source_zone is finished. The iperf tool will stop printing output messages when it's done.
You can observe the network statistics from the global zone. This is useful if you define multiple flows and you want to monitor them from a central location.
Let's define another network flow in
source_zone. We will define the flow on vnic0 using the TCP port 443:root@source_zone # flowadm add-flow -l vnic0 -a transport=TCP,local_port=443 https-flow
From the global zone, verify the flows that we created in the previous steps:
root@global_zone # flowadm show-flow
FLOW        LINK                IPADDR                   PROTO  LPORT   RPORT   DSFLD
source_zone/https-flow vnic0    --                       tcp    443     --      --
target_zone/https-flow vnic1    --                       tcp    443     --      --
Start the
iperf benchmark again on source_zone:root@source_zone:~# iperf -c 10.0.0.2 -l 128k -P 4 -i 1 -t 180 -p 443
From the global zone, start the network flows observation:
root@global_zone:~# flowstat -i 1
FLOW IPKTS RBYTES IDROPS OPKTS OBYTES ODROPS
source_zone/https-flow 0 0 0 0 0 0
target_zone/https-flow 132.33M 198.97G 0 17.31M 1.14G 0
source_zone/https-flow 0 0 0 0 0 0
target_zone/https-flow 848.25K 1.28G 0 109.92K 7.25M 0
source_zone/https-flow 0 0 0 0 0 0
target_zone/https-flow 848.26K 1.28G 0 110.05K 7.26M 0
^C
Note: To stop the
flowstat command, press Ctrl-c.
You can see the network statistics for the two flows that we created in the previous steps (
source_zone/https-flow andtarget_zone/https-flow). Thus, we can monitor both the zones and their associated flows!
Optional: Once you finish your network measurements, you can remove the flow:
root@target_zone:~# flowadm remove-flow https-flow
Verify the flow removal:
root@target_zone:~# flowadm show-flow
Note: You don't need to reboot the zone in order to remove the flow; this is very useful in production environments.
Collecting and Analyzing Historic Network Statistics
In our final use case, we will use the Oracle Solaris 11 ability to store historic network statistics data. This is convenient if we are running our benchmark for a long period and we want to see network trends. Network usage statistics can be stored by using the Oracle Solaris extended accounting facility. For more information see
acctadm(1M).
In addition, if we're suspicious that we are having network performance degeneration, we can compare the current network statistics to the historical network statistics.
The extended accounting facility allows you to collect various operating systems statistics—for example, statistics for tasks, processes, and flows—and store them in order to perform performance analyses for long intervals such as weeks, months, and years.
Note: The Oracle Solaris extended accounting facility can be enabled both in global and non-global zones.
In this use case, we will use the extended accounting facility in order to collect networking statistics.
From the global zone, enable the extended accounting facility:
root@global_zone:~# acctadm -e extended -f /var/log/net.log net
Verify the activation of the extended accounting facility:
root@global_zone:~# acctadm net
Net accounting: active
Net accounting file: /var/log/net.log
Tracked net resources: extended
Untracked net resources: none
From now on, the network usage history statistics are stored in the
/var/log/net.log file.
The following example shows historical statistics about network traffic and its use of resources on the
vnic0 datalink:root@global_zone:~# dlstat show-link -h -f /var/log/net.log vnic0 LINK START END RBYTES OBYTES BANDWIDTH vnic0 10:45:52 10:46:12 1502 0 0 Mbps vnic0 10:46:12 10:46:32 1918 0 0 Mbps vnic0 10:46:32 10:46:52 2676218 4668466 1878.091 Mbp vnic0 10:46:52 10:47:12 1313205 2057617 8282.997 Mbp
If we used this facility to collect network statistics for a long duration, we can show historical network statistics.
To display historical statistics of resource usage by traffic on
vnic0 over a given date and time range (for example, from January 1, 2013 until June 24, 2013), run the command shown in Listing 3:root@global_zone:~# dlstat show-link -h -s 01/01/2013,00:00:00 -e 06/24/2013,10:50:00 -f /var/log/net.log vnic0 LINK START END RBYTES OBYTES BANDWIDTH vnic0 10:45:52 10:46:12 1502 0 0 Mbps vnic0 10:46:12 10:46:32 1918 0 0 Mbps vnic0 10:46:32 10:46:52 2676218 4668466 1878.091 Mbp vnic0 10:46:52 10:47:12 1313205 2057617 8282.997 Mbp vnic0 10:47:12 10:47:32 3790824 5786125 2329.613 Mbp vnic0 10:47:32 10:47:52 860 126 0 Mbps vnic0 10:47:52 10:48:12 890 0 0 Mbps vnic0 10:48:12 10:48:32 330 0 0 Mbps vnic0 10:48:32 10:48:52 212 0 0 Mbps vnic0 10:48:52 10:49:12 243 0 0 Mbps vnic0 10:49:12 10:49:32 0 0 0 Mbps vnic0 10:49:32 10:49:52 274 126 0 Mbps
Listing 3
Visualizing the Network Statistics
We can format the output in
gnuplot format, which is a command-driven interactive function plotting tool, and later we can use it in order to generate performance graphs. For more information, see gnuplot(1).
Let's display historical statistics of resource usage by traffic on
vnic0 over a given date and time range (for example, from June 24, 2013 until June 25, 2013) using the gnuplot format:root@global_zone:~# dlstat show-link -h -s 06/24/2013 -e 06/25/2013 -F gnuplot -f /var/log/net.log vnic0 > /var/tmp/netplot.dat
Now, let's format our output file for better readability (we will convert the bandwidth measurement to the 10-GB range):
root@global_zone:~# cat /var/tmp/netplot.dat | awk '{print $1,$2/1000}' > /var/tmp/netplot_format.dat
Then we will generate our graph using
gnuplot.
In order to use the
gnuplot tool, you need to install the Oracle Solaris desktop package. The first command below installs the gnuplottool. The command below that installs the Oracle Solaris desktop package.root@global_zone:~# pkg install gnuplot root@global_zone:~# pkg install solaris-desktop
Then, we need to prepare the plot file in order to set up the plot properties (later we will load the file into the
gnuplot tool).
Edit the plot file using your favorite editor, as shown in Listing 4.
root@global_zone:~# vi /var/tmp/plot_file

set autoscale
unset log
unset label
set xtic auto
set ytic auto
set title "Network statistics"
set xlabel "Time"
set ylabel "Bandwidth (Mb/sec)"
set xdata time
set timefmt "%H:%M:%S"
plot "/var/tmp/netplot_format.dat" using 1:2 title "Bandwidth (Mb/sec)" with lines
Listing 4
In order to access our system using a GUI desktop, we need to start the VNC server, as shown below.
root@global_zone:~# vncserver :1
You will require a password to access your desktops.

Password:
Verify:

New 'global_zone:1 (root)' desktop is global_zone:1
Note: Remember the password; you will need later it to connect to the VNC server. For more VNC server setup examples, see the Oracle Solaris 11.1 Desktop Administrator's Guide.
You can now connect remotely via VNC viewer/client software (such as the freeware TightVNC viewer).
Note: You should connect to the address that showed in the
desktop is: message.$ vncviewer global_zone:1
After you log in using the VNC viewer/client software, open a terminal window by right-clicking any point in the background of the desktop and selecting Open Terminal in the pop-up menu, as shown in Figure 4.
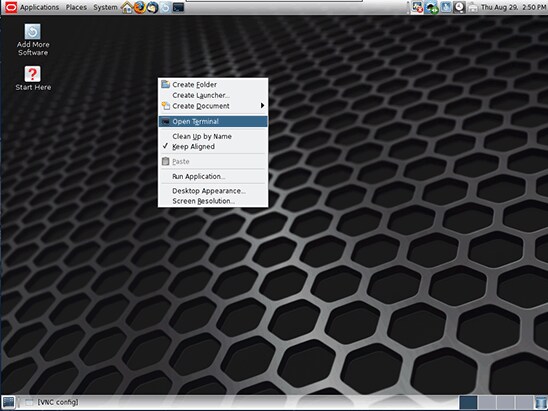
Figure 4
At the terminal window, run the
gnuplot tool:root@global_zone:~# gnuplot
From the
gnuplot prompt, load the plot file, as shown in Figure 5:gnuplot> load '/var/tmp/plot_file'
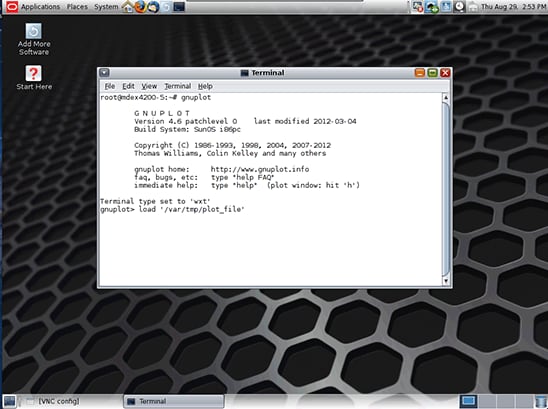
Figure 5
Based on your network statistics collection,
gnuplot will display a graph, as shown in Figure 6: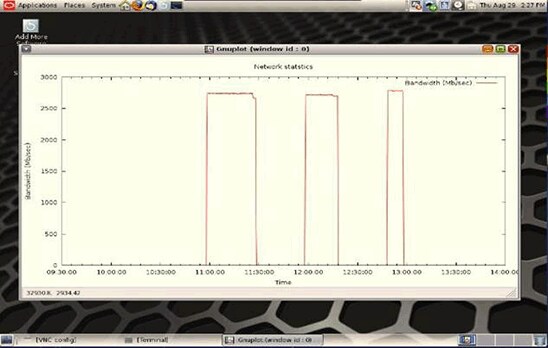
Figure 6
You can see that we had a network traffic spike at 11:00, 11:50, and 12:45.
For more Oracle Solaris performance graph examples with
gnuplot, see Graphing Solaris Performance Stats with gnuplot.
Optional: You can disable the network extended accounting facility using the following command:
root@global_zone:~# acctadm -D net
Verify that the network extended accounting facility is inactive:
root@global_zone:~# acctadm net
            Net accounting: inactive
       Net accounting file: /var/log/net.log
     Tracked net resources: none
   Untracked net resources: extended
Conclusion
In this article, we saw how we can leverage the built in Oracle Solaris 11
iperf, dlstat, flowadm, and flowstat commands in order to observe and gather network statistics.See Also
- For more information about Oracle Solaris networking, see "How to Control Your Application's Network Bandwidth"
- For more information about Oracle Solaris Zones, see Oracle Solaris 11.1 Administration: Oracle Solaris Zones, Oracle Solaris 10 Zones, and Resource Management
Also see these additional publications by this author:
- "How to Set Up a MongoDB NoSQL Cluster Using Oracle Solaris Zones"
- "How to Set Up a Hadoop Cluster Using Oracle Solaris Zones"
- "How to Migrate Oracle Database from Oracle Solaris 8 to Oracle Solaris 11"
- "Increasing Application Availability by Using the Oracle VM Server for SPARC Live Migration Feature: An Oracle Database Example"
- "How Traffix Systems Optimized Its LTE Diameter Load Balancing and Routing Solutions Using Oracle Hardware and Software"
- Orgad's blog: The Art of Virtualization: Cloud Computing and Virtualization Use Cases and Tutorials
And here are additional Oracle Solaris 11 resources:
- Download Oracle Solaris 11
- Access Oracle Solaris 11 product documentation
- Access all Oracle Solaris 11 how-to articles
- Learn more with Oracle Solaris 11 training and support
- See the official Oracle Solaris blog
- Check out The Observatory and OTN Garage blogs for Oracle Solaris tips and tricks
- Follow Oracle Solaris on Facebook and Twitter
About the Author
Orgad Kimchi is a principal software engineer on the ISV Engineering team at Oracle (formerly Sun Microsystems). For 6 years he has specialized in virtualization and cloud computing technologies.
| Revision 1.0, 09/09/2013 |
Comentarios
Publicar un comentario