
Install Apache, MariaDB and PHP7 (LAMP Stack) on Ubuntu 16.04 LTS/Ubuntu 17.04
Apache PHP7.0 Module vs PHP-FPM
Step 1: Update Ubuntu 16.04 LTS
#sudo apt-get update

#sudo apt-get upgrade

#sudo apt-get dist-upgrade
Step 2: Install Apache Web Server
#sudo apt-get install apache2 apache2-utils
#systemctl status apache2
If it’s not running, use systemctl to start it.
#sudo systemctl start apache2
#sudo systemctl enable apache2
Check Apache version:
#apache2 -v
o
#apache2ctl -V
we need to make
www-data (Apache user)
as the owner of web root directory.#sudo chown www-data /var/www/html/ -R
Step 3: Install MariaDB
MariaDB
is a drop-in replacement for MySQL. It is developed by former members
of MySQL team who concerned that Oracle might turn MySQL into a
closed-source product. Many Linux distributions and companies have
migrated to MariaDB. So we’re going to install MariaDB instead of
MySQL
#sudo apt-get install mariadb-server mariadb-client
After it’s installed, MariaDB server should be automatically
stared. Use systemctl to check its status.
#systemctl status mysql
If it’s not running, start it with this command:
#sudo systemctl start mysql
To enable MariaDB to automatically start when Ubuntu 16.04 is rebooted:
#sudo systemctl enable mysql

Now run the post installation security script.
#sudo mysql_secure_installation
Step 4: Install PHP7
Enable the Apache
php7.0 module then restart Apache Web server.
#sudo a2enmod php7.0
#sudo systemctl restart apache2
Step 5: Test PHP
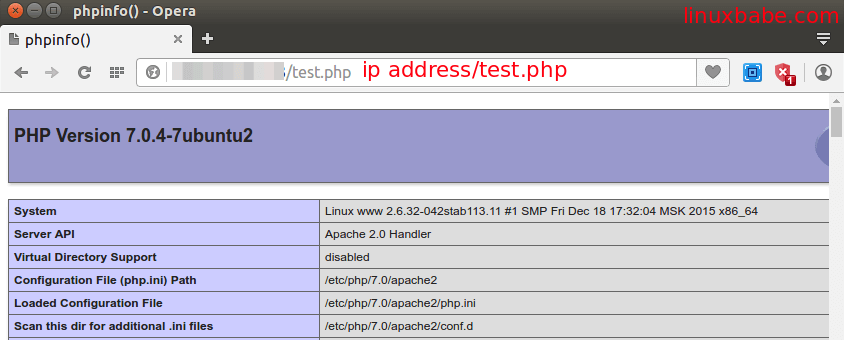
#sudo nano /var/www/html/test.php
<?php phpinfo(); ?>
Save and close the file. Now in the browser address bar, enter
server-ip-address/test.php. Replace
sever-ip-address with your actual IP. Of
course, if you follow this tutorial on your local computer, then type
127.0.0.1/test.php or
localhost/test.php.You should see your server’s PHP information. This means PHP processing is fine. You can find that Zend OPcache is enabled.
Apache PHP7.0 Module vs PHP-FPM
There are now basically two ways to run PHP code with Apache web server:-
Apache PHP module
-
PHP-FPM.
test.php file now so that no one
else can see your server’s information and don’t follow the
instructions below.But if you want to use PHP-FPM to run PHP code, then you need to enable Apache
mod_proxy_fcgi module with
the following command:#sudo a2enmod proxy_fcgiThen edit the virtual host configuration file. This tutorial uses the default virtual host as an example.
#sudo nano /etc/apache2/sites-available/000-default.conf
Add the
ProxyPassMatch directive to this
file.....
ErrorLog ${APACHE_LOG_DIR}/error.log
CustomLog ${APACHE_LOG_DIR}/access.log combined
ProxyPassMatch ^/(.*\.php(/.*)?)$ unix:/run/php/php7.0-fpm.sock|fcgi://localhost/var/www/html/
.....
Save and close this file. Restart Apache2.
#sudo systemctl restart apache2
Start php7.0-fpm
#sudo systemctl start php7.0-fpm
Enable php7.0-fpm to start at boot time.
#sudo systemctl enable php7.0-fpm
Check status:
#systemctl status php7.0-fpm
php7.0-fpm.service - The PHP 7.0 FastCGI Process Manager
 Loaded: loaded (/lib/systemd/system/php7.0-fpm.service; enabled; vendor pre
set: enabled)
 Active: active (running) since Wed 2016-04-20 19:21:05 EDT; 2s ago
Now if you refresh the test.php page in
your browser, you will find that Server API is FPM/FastCGI
which means Apache web server will pass PHP requests to PHP-FPM.
Comentarios
Publicar un comentario